AI 最新资讯每日播报 · 逐步记录
Skill 不是一键生成 Agent 代码,而是 Cursor Agent 读 SKILL.md 后逐步执行的操作手册。步骤 1「下模板」也是 Skill 规定的创建方式,由 Agent 替你跑命令,不是另找文档手动做。修改 Agent 时每个文件都有改前/改后、原因、截图。Demo:/Users/bitmart/work/codes/tmp/ai-daily-news
总流程
login + install Skill
触发 Skill
创建 + 跑通
8 个文件
安装 standalone-repo-agent Skill
npx https://plugin-marketplace.bmaws-infra.com/api/cli login
npx https://plugin-marketplace.bmaws-infra.com/api/cli install --tool cursor standalone-repo-agent
npx https://plugin-marketplace.bmaws-infra.com/api/cli list
A1 · Web UI 创建 PAT
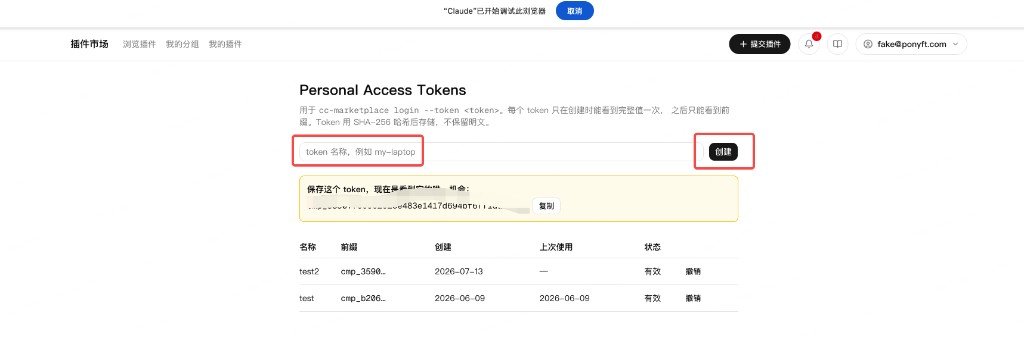
A2 · 终端 login
~/.cc-marketplace/config.json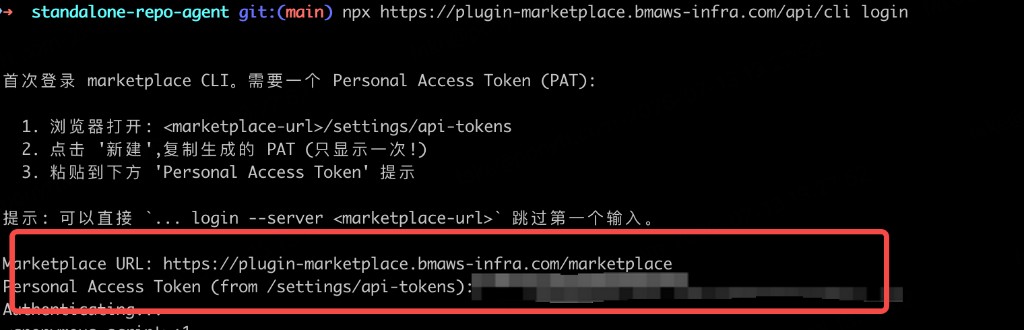
A3 · install + list
~/.cursor/skills/standalone-repo-agent/SKILL.md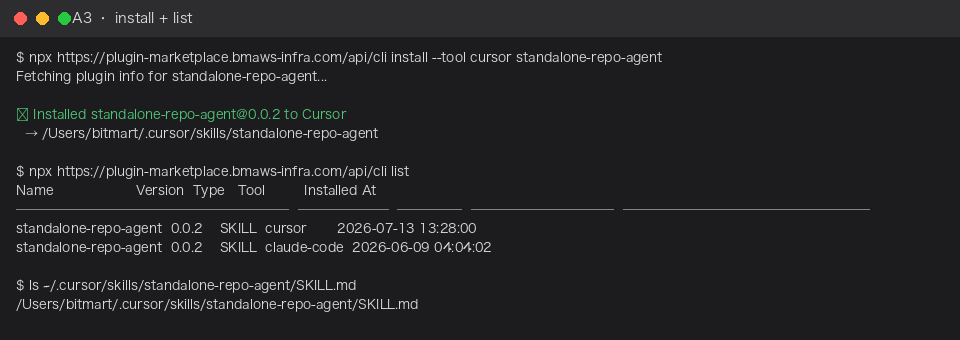
Cursor 触发 Skill

环境检查

创建 Agent(Skill 步骤 1 · Agent 执行)
ai-daily-news 骨架。builder.py / core.py / CLI 的标准独立仓,无需从零搭。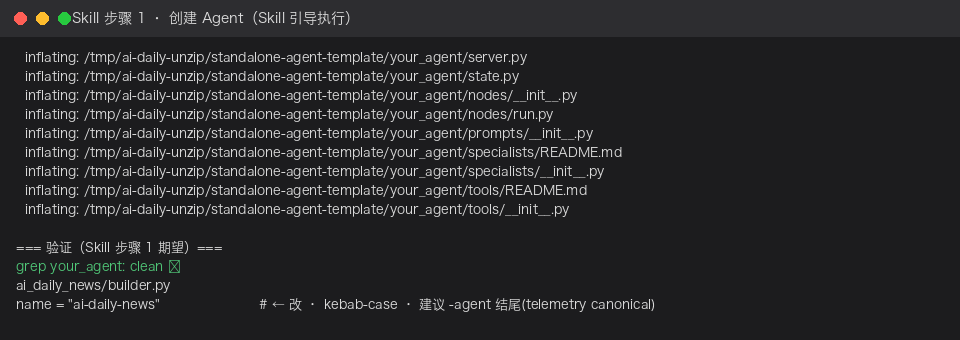
Nexus 凭据
uv sync 从 Nexus 拉 ai-trust-toolkit-bom
安装 + 首次跑通
success=True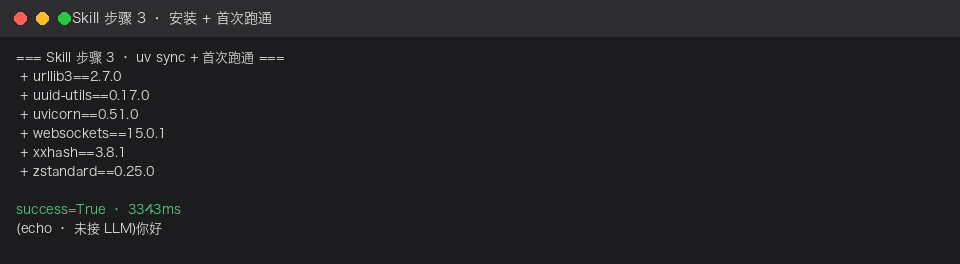
此时还是模板 nodes/run.py 里的 run_node 在做回声 demo · 输出 (echo · 未接 LLM)你好(见下方「run.py 是什么?」)
修改 Agent · 逐文件记录(Skill 步骤 4-7)
修改顺序(建议按此顺序,避免 import 报错):
  ① prompts/__init__.py
  ② state.py
  ③ nodes/fetch.py      ← 新建
  ④ nodes/broadcast.py  ← 新建
  ⑤ nodes/__init__.py
  ⑥ builder.py
  ⑦ core.py             ← Skill 步骤 5 telemetry
  ⑧ tests/test_smoke.py ← Skill 步骤 7
4-1 · prompts/__init__.py
ai_daily_news/prompts/__init__.pybroadcast_node 引用 BROADCAST_SYSTEM,约束输出 📢 标题 + 今日要闻 + 值得跟进 + 展望。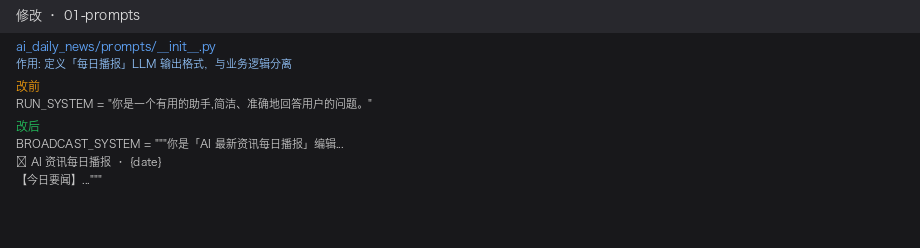
改前
RUN_SYSTEM = "你是一个有用的助手,简洁、准确地回答用户的问题。"改后
BROADCAST_SYSTEM = """你是「AI 最新资讯每日播报」编辑...
📢 AI 资讯每日播报 · {date}
【今日要闻】1. ... 2. ...
【值得跟进】- ...
【一句话展望】..."""
4-2 · state.py
ai_daily_news/state.pyfetch_node 写 headlines_text · broadcast_node 读它生成 output。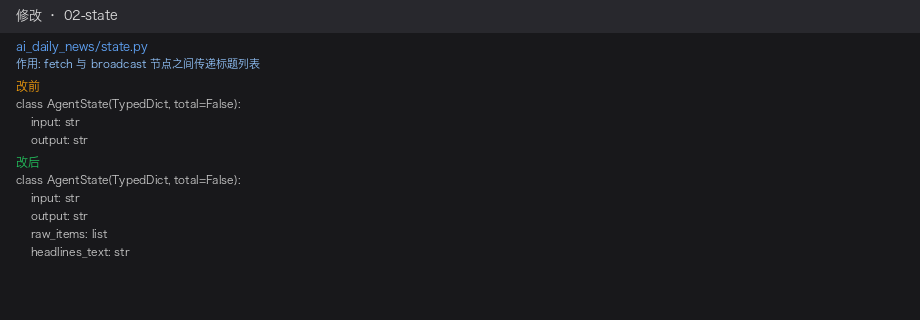
class AgentState(TypedDict, total=False):
    input: str
    output: str
    raw_items: list        # fetch 写入
    headlines_text: str    # fetch → broadcast
深读 · 每个字段的作用
AgentState 是 LangGraph 全图共享的数据契约;各节点 return 的字段会合并进同一份 state(不是整份替换)。total=False 表示字段均可选,随节点逐步补齐。
| 字段 | 谁写入 | 谁读取 | 作用 |
|---|---|---|---|
input | CLI / 调用方 | broadcast | 可选「日期提示」,如 "2026-07-13",用于播报标题里的日期;不是资讯正文(资讯来自 RSS) |
output | broadcast | CLI、core | 最终交付物:📢 每日播报正文;CLI 打印 final_state["output"] |
raw_items | fetch | (预留) | 结构化列表 [{"title","link"}, ...],便于调试、存历史、扩展;当前 broadcast 不直接读 |
headlines_text | fetch | broadcast、core、测试 | 标题列表的 multiline 文本,喂给 LLM;core 用它判 fetch 是否跑过 |
数据流:
CLI {"input":"2026-07-13"}
  → fetch 写 raw_items + headlines_text
  → broadcast 读 input + headlines_text → 写 output
  → core 读 output + headlines_text 判 success
4-3 · nodes/fetch.py 【新建文件】
ai_daily_news/nodes/fetch.pyhnrss.org?q=AI · 失败用 FALLBACK · 返回 headlines_text 供下一节点。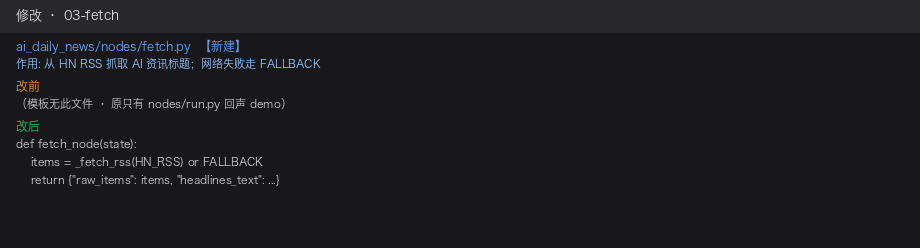
def fetch_node(state: AgentState) -> AgentState:
    items = _fetch_rss(HN_RSS) or FALLBACK
    headlines_text = "\n".join(f"- {x['title']}" for x in items[:8])
    return {"raw_items": items, "headlines_text": headlines_text}
4-4 · nodes/broadcast.py 【新建文件】
ai_daily_news/nodes/broadcast.pyget_llm("sonnet") + BROADCAST_SYSTEM → 写回 output;无 key 时 echo 结构化兜底。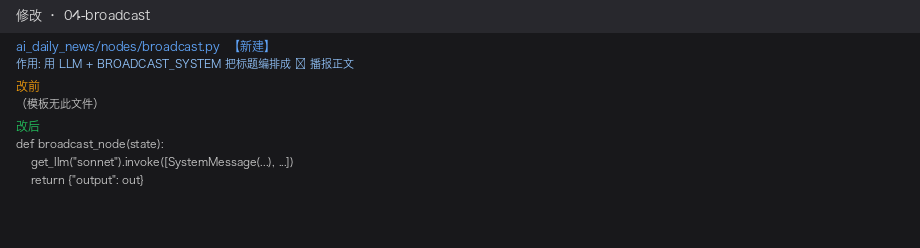
def broadcast_node(state: AgentState) -> AgentState:
    headlines = state.get("headlines_text", "")
    # get_llm("sonnet").invoke([SystemMessage(BROADCAST_SYSTEM), ...])
    return {"output": out}
4-5 · nodes/__init__.py
ai_daily_news/nodes/__init__.pyfrom .nodes import fetch_node, broadcast_node 引用节点,必须导出。run_node 导出(run.py 可保留但不再接入图)。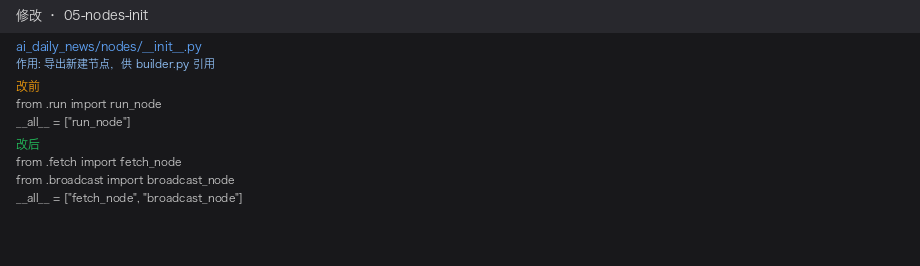
from .broadcast import broadcast_node
from .fetch import fetch_node
__all__ = ["fetch_node", "broadcast_node"]
run.py 是什么?
nodes/run.py 是独立仓模板自带的单节点 demo 文件,不是平台强制要求的文件名。
模板刚下好时,图里只有这一个节点:
nodes/run.py          ← def run_node(state): 读 input · 调 LLM · 写 output
builder.py            ← add_node("run", run_node) · run → END
Skill 步骤 4 写「改 nodes/run.py」的意思是:简单单节点 Agent 可以继续在 run.py 里写业务,不必新建别的文件。
| Agent 类型 | 要不要 run.py | 做法 |
|---|---|---|
| 单节点(一问一答) | 可以继续用 | 只改 run.py + prompt,builder 保持 run → END |
| 多节点(本 Demo) | 不必接入图 | 新建 fetch.py / broadcast.py,改 builder;run.py 可删 |
| 单节点但换名字 | 不必叫 run.py | 例如只有 summarize.py,builder 里 add_node("summarize", ...) |
框架真正要求的是:nodes/*.py 里有节点函数 · nodes/__init__.py 导出 · builder.py 串图 —— 没有「必须有 run.py」这条规则。
本 Demo 改完后 run.py 仍可能在磁盘上,但不在执行路径里(builder / __init__ 都不再引用)。它还引用已删的 RUN_SYSTEM,建议删除以免误导。
深读 · __init__.py 与 run.py 的关系
nodes/__init__.py 是包的对外出口:让 builder.py 写 from .nodes import fetch_node, broadcast_node,而不必 from .nodes.fetch import ...。
| 改前(模板) | 改后 | |
|---|---|---|
| 导出 | run_node | fetch_node + broadcast_node |
| builder | run → END | fetch → broadcast → END |
以后加第三节点:新建 nodes/xxx.py → 在 __init__.py export → 在 builder.py add_node / add_edge。
4-6 · builder.py(包根 · 不在 nodes/)
ai_daily_news/builder.pyrun→END 改为两节点流水线。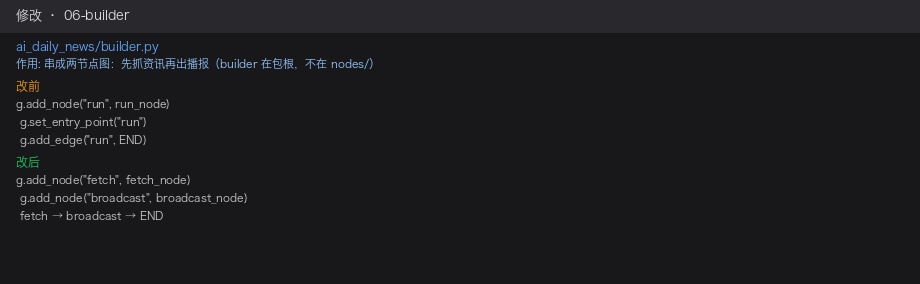
def build_graph() -> Any:
    from langgraph.graph import END, StateGraph

    g = StateGraph(AgentState)
    g.add_node("fetch", fetch_node)
    g.add_node("broadcast", broadcast_node)
    g.set_entry_point("fetch")
    g.add_edge("fetch", "broadcast")
    g.add_edge("broadcast", END)
    return g.compile()
深读 · build_graph() 逐行
| 代码 | 含义 |
|---|---|
def build_graph() -> Any | 工厂函数;返回编译后可 .invoke() 的 graph |
from langgraph.graph import END, StateGraph | 延迟 import;StateGraph 建图,END 是结束哨兵 |
g = StateGraph(AgentState) | 指定 state 类型;各节点读写同一份 state 并 merge 字段 |
g.add_node("fetch", fetch_node) | 注册节点:图内名 "fetch" → 函数 fetch_node |
g.add_node("broadcast", broadcast_node) | 同上,第二个业务节点 |
g.set_entry_point("fetch") | 入口:invoke 后第一个跑 fetch(不是 broadcast) |
g.add_edge("fetch", "broadcast") | fetch 完成后自动进入 broadcast;headlines_text 在此传递 |
g.add_edge("broadcast", END) | broadcast 完成后图结束,返回 final state |
return g.compile() | 编译蓝图为可执行 graph;core.py / 测试调 .invoke() |
执行顺序:
invoke({"input":"..."}) → fetch → broadcast → END → 返回含 output 的 state
5 · core.py(Skill 步骤 5 · telemetry)
ai_daily_news/core.pyrecord_effect("briefing_sent", 1) · 成功判定需同时有 output 和 headlines_text。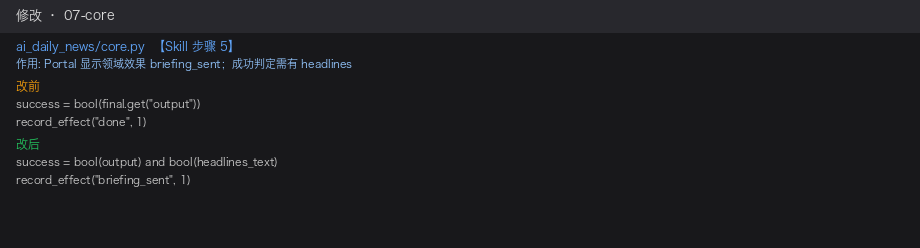
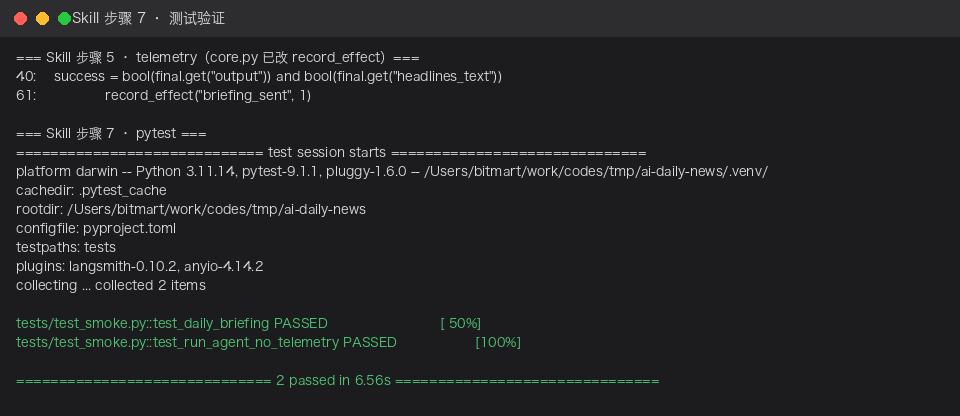
success = bool(final.get("output")) and bool(final.get("headlines_text"))
record_effect("briefing_sent", 1)
深读 · core.py 结构与逐段说明
core.py 是 CLI / Pod 共用的跑图 + 包装结果 + 上报 Portal 入口,不直接写业务逻辑。
RunResult(dataclass):success 是否业务成功 · status ok/failsafe · duration_ms 耗时 · final_state 图跑完后的完整 state(CLI 从这里取 output)。
run_agent(...) 主流程:
| 步骤 | 代码 | 说明 |
|---|---|---|
| 1 | graph = build_graph() | 拿到 fetch→broadcast 编译图 |
| 2 | final = graph.invoke(initial_state, ...) | 真正跑图;recursion_limit: 50 防死循环 |
| 3 | success = output and headlines_text | 本 Demo 改动:成功 = 有播报 + fetch 跑过(模板只判 output) |
| 4 | 组装 RunResult | 含耗时、final_state |
| 5 | if telemetry: _report(...) | 默认上报;--no-telemetry 或测试可关 |
_report(...):bind_effect() 上下文 · 成功时 record_effect("briefing_sent", 1)(模板是 "done")· push_invoke_metrics 推调用 KPI · 整个 try 包上报,失败静默不阻断业务。
调用链:
cli run "..." → run_agent({"input":...}) → build_graph().invoke() → 打印 final_state["output"]
7 · tests/test_smoke.py(Skill 步骤 7)
tests/test_smoke.pyheadlines_text 存在 · CI 不依赖外网 LLM。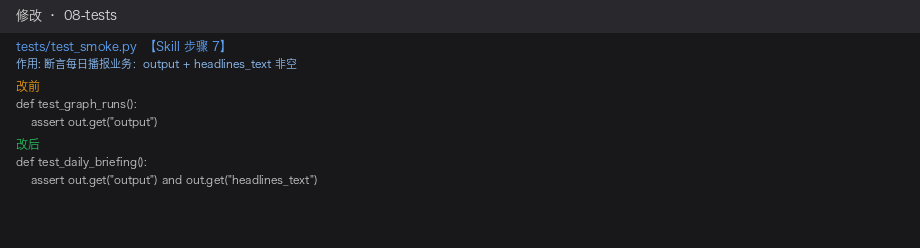
def test_daily_briefing():
    out = build_graph().invoke({"input": "2026-07-13"})
assert out.get("output") and out.get("headlines_text")测试验证(全部改完后)
uv run ai-daily-news run "2026-07-13"
uv run --extra test pytest -v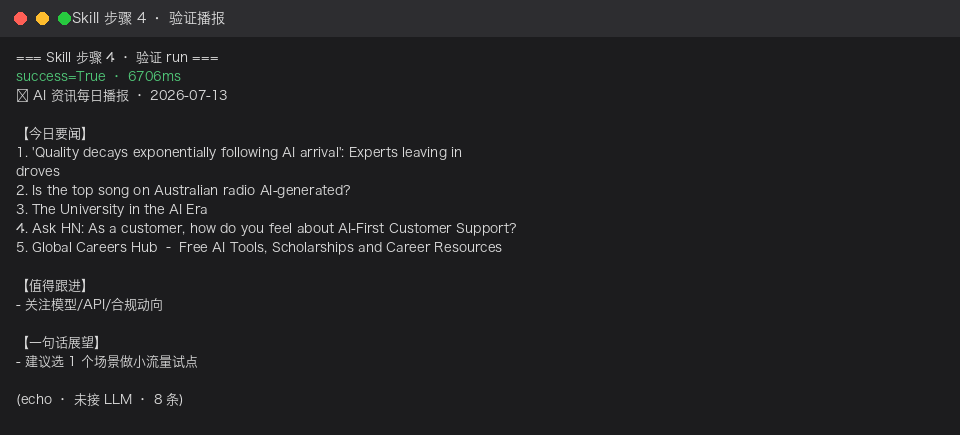
截图 · 📢 每日播报 · 8 条 RSS · success=True
三种访问方式:CLI / MCP / Pod(Skill 步骤 6)
cli.py + pyproject.toml 脚本入口);Pod 需少量改动;MCP 需另建一个 -mcp 包。| 形态 | 模板里有没有 | 谁在用 | 要不要部署服务 |
|---|---|---|---|
| CLI | ✅ cli.py 已有 | 本机 / cron / 脚本 | 否 |
| Pod | ✅ server.py 骨架已有 | 定时任务 / 其他系统 HTTP 调 | 是(uvicorn 或 obelisk) |
| MCP | ❌ 需另建 ai-daily-news-mcp | Cursor / Claude Code 里当 tool | 否(本机 stdio 进程) |
有 cli.py 就能直接执行该文件吗? 可以但不推荐作为主方式。模板设计是:
- 推荐:
uv run ai-daily-news run "..."(走pyproject.toml里[project.scripts]注册的命令) - 开发调试:
uv run python -m ai_daily_news.cli run "..." - 可但不常用:
uv run python ai_daily_news/cli.py run "..."(文件底部有if __name__ == "__main__") - 发给队友:
pipx install ai-daily-news后全局命令ai-daily-news run "..."
模板自带入口文件:
ai_daily_news/cli.py      ← Typer CLI · 调 core.run_agent(form="cli")
ai_daily_news/server.py   ← build_router() · Pod 时 HTTP POST
ai_daily_news/core.py     ← 三种形态共用 · 真正跑图的地方
方式 A · CLI(默认 · Agent 创建好即可用)
模板里已有、不用新建的文件:
ai_daily_news/cli.py pyproject.toml → [project.scripts] ai-daily-news = "ai_daily_news.cli:app"从创建到访问 · 逐步操作:
| 步 | 做什么 | 命令 / 文件 |
|---|---|---|
| 1 | Skill 步骤 1–3 起仓、uv sync | 模板已带 cli.py |
| 2 | 步骤 4 改业务图 | 一般不改 cli.py |
| 3 | 配 LLM(可选) | .env 里 ANTHROPIC_API_KEY=... |
| 4 | 本机访问 Agent | uv run ai-daily-news run "2026-07-13" |
| 5 | 调试不上报 Portal | 加 --no-telemetry |
| 6 | 定时每日播报(可选) | cron: 0 9 * * * cd .../ai-daily-news && uv run ai-daily-news run "$(date +\%F)" |
| 7 | 发 Nexus 给队友(步骤 9) | pipx install --index-url .../local-pipy/simple/ ai-daily-news |
# 本 Demo 访问示例
cd /Users/bitmart/work/codes/tmp/ai-daily-news
uv run ai-daily-news run "2026-07-13"
uv run ai-daily-news run "2026-07-13" --no-telemetry方式 B · Pod / HTTP(常驻服务 · 需改 2 个文件)
要改的文件:
pyproject.toml ai_daily_news/server.py从创建到 HTTP 访问 · 逐步操作:
| 步 | 做什么 | 怎么改 |
|---|---|---|
| 1 | 前提:CLI 已跑通 | 步骤 3–4 完成 |
| 2 | 加 HTTP 依赖 | pyproject.toml dependencies 加 "fastapi>=0.110", "uvicorn>=0.30" |
| 3 | 启用 app | server.py 底部 app = None → app = _make_app() |
| 4 | 核对路由(通常已写好) | POST /agents/ai-daily-news/run body {"input":"..."} |
| 5 | uv sync 装新依赖 | — |
| 6 | 起服务 | uv run uvicorn ai_daily_news.server:app --host 0.0.0.0 --port 8080 |
| 7 | HTTP 访问 Agent | 见下方 curl |
| 8 | 生产上线(步骤 9) | build 镜像 → obelisk 部署 · 涉权下游 → 安全 7 问 |
server.py 底部改一行
app = _make_app() # 原: app = Noneuv sync
uv run uvicorn ai_daily_news.server:app --host 127.0.0.1 --port 8080
curl -s -X POST http://127.0.0.1:8080/agents/ai-daily-news/run \
-H 'Content-Type: application/json' \
-d '{"input":"2026-07-13"}'{"success":true,"status":"ok","output":"📢 AI 资讯每日播报 ..."}方式 C · MCP(给 Cursor / Claude Code · 需另建包)
apps/bmc-agent-mcp 起一个 ai-daily-news-mcp 子项目(内嵌 import 主包的 run_agent,不走 HTTP)。和 CLI 的区别:CLI 是终端命令;MCP 是 IDE 通过 stdio 协议调一个常驻小进程,进程内部仍调同一个 core.run_agent。
从创建到 IDE 访问 · 逐步操作:
| 步 | 做什么 | 说明 |
|---|---|---|
| 1 | 前提:ai-daily-news CLI 已跑通 | 主包先发布或本机 editable 可 import |
| 2 | 新建 MCP 包目录 | 例如 ai-daily-news-mcp/(可与主仓同级或 monorepo 里单独 app) |
| 3 | 依赖 | mcp>=1.0 + 依赖主包 ai-daily-news |
| 4 | 写 MCP server | 照 bmc-agent-mcp/bmc_agent_mcp/server.py:用 FastMCP 暴露 tool,tool 内 from ai_daily_news.core import run_agent |
| 5 | 注册 scripts | pyproject.toml:ai-daily-news-mcp = "ai_daily_news_mcp.server:main" |
| 6 | 安装 | pipx install ai-daily-news-mcp 或 uv run 开发 |
| 7 | 配 Cursor | 设置 → MCP → 添加 stdio server,command 指向 mcp 入口 |
| 8 | IDE 里访问 | 对话中让 Agent 调你的 MCP tool(如 run_daily_briefing) |
MCP tool 示意(逻辑等价,非完整代码)
# ai_daily_news_mcp/server.py(新包 · 参考 bmc-agent-mcp)
from mcp.server.fastmcp import FastMCP
from ai_daily_news.core import run_agent

mcp = FastMCP("ai-daily-news")

@mcp.tool()
def run_daily_briefing(date: str = "") -> str:
    """生成 AI 资讯每日播报"""
    res = run_agent({"input": date or "today"}, form="mcp")
    return res.final_state.get("output", "")
Cursor MCP 配置示意(~/.cursor/mcp.json 或项目 .cursor/mcp.json):
{
  "mcpServers": {
    "ai-daily-news": {
      "command": "ai-daily-news-mcp",
      "args": []
    }
  }
}apps/bmc-agent-mcp 结构,把 bmc_agent 换成 ai_daily_news。详见 平台教程 Day 13。怎么选(Skill 步骤 6 表):本机敏感数据 → 只 CLI · 要 IDE 一键调 → CLI + MCP · 要被 HTTP/定时调 → CLI + Pod · 三者可叠加,共用同一 core.py / 业务图。